
Setting the Degrees of Freedom
The setting of the "degrees of freedom" (DoF) determines the what types of change (distortion) may be made to the registered images to make them align with the fixed image. There are are four basic types of distortion that can be applied to the images:
- Translation. You can permit or disallow separate translations (shifts) in the x (horizontal), y (vertical) and z (through-plane) directions.
- Rotation. You can permit or disallow separate rotations about the x, y and z axes.
- Scale. You can permit or disallow enlargement (scale > 1) or shrinkage (scale < 1) of the images in the x, y and z directions. A negative scale will cause the image to flip about an axis.
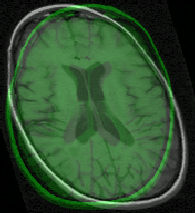
- Shear. This causes a "trapezoidal" distortion of the image. For
example, an xy shear causes a horizontal shift in the image that depends
on the y-location. This is illustrated in the picture, where the an xy
shear has been applied, and the original image is shown in green
underneath.
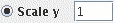
To allow a particular degree of freedom, select the button next to that DoF. For example, to allow scaling in the y-direction, select:
The number to the right of the DoF (in this case, 1) is the initial
setting for that degree of freedom: when the registration is performed,
the search procedure starts looking for the best registration parameters
using the values you set in here. If you have not allowed the DoF, then the
number cannot be changed, and is ignored.
To reset any changes back to the Identity transform (no distortion), click on the
Above the Degrees of Freedom are the "Presets" buttons, that set up to allow
particular types of distortion. Click one of these buttons to allow:
Remember, the more types of distortion (degrees of freedom) are
allowed, the slower will be the registration process and the more chances
there are for the registration procedure to go wrong and produce unexpected results
when trying to register "difficult" images. Only use as many degrees of
freedom as are demanded by the problem.
There are several user settings for registration:
When you have set or removed limits, press the
Select the fixed image by clicking on the
Next, select the images that you want to register to the fixed
image by clicking on the
You can remove all the images from the list by clicking the
Now click on the
The registered images have the same numbers of rows,
columns and slices as the fixed image, but will have pixel
intensity values taken from the registered images after they have
been re-aligned to match the position of the fixed image. The
registered image are automatically given a name the same as the
input images, but with the letter "r" prepended to the name. For
example, if you chose an image to be registered with a name
If you want to check on the quality of the registration, the best way is to load the fixed image into Jim's main display
window. Then, load the registered image as an overlay image. You can automatically get Jim to
load the registered image to the overlay by selecting the  button.
 For
intra-subject registration where there are no rotational differences
between the scans.
For
intra-subject registration where there are no rotational differences
between the scans.
 For
intra-subject registration where there are no translational differences
between the scans (not generally useful).
For
intra-subject registration where there are no translational differences
between the scans (not generally useful).
 For
intra-subject registration where there are translational and rotational differences
that need to be corrected. No shape distorting changes are allowed.
For
intra-subject registration where there are translational and rotational differences
that need to be corrected. No shape distorting changes are allowed.
 For
inter-subject registration where the quality of data does not allow full
Affine registration to be used robustly. Size changes are allowed.
For
inter-subject registration where the quality of data does not allow full
Affine registration to be used robustly. Size changes are allowed.
 For
inter-subject registration with the full range of linear distortions allowed.
For
inter-subject registration with the full range of linear distortions allowed.
Other Settings
 Select this option if you want the intensities of the registered image to match, as closely as
possible, those of the fixed image after registration.
Select this option if you want the intensities of the registered image to match, as closely as
possible, those of the fixed image after registration.
 Clicking this button brings up a dialog to set limits on the magnitude of the distortions
allowed during the registration procedure:
Clicking this button brings up a dialog to set limits on the magnitude of the distortions
allowed during the registration procedure:
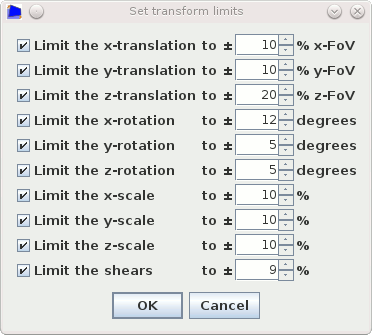
 will (soft) limit the
x-translation to be within 10% of the field-of-view. This can be useful if you know that
the images to be registered are already in fairly good alignment, or you
set the initial transform to bring them fairly close to
alignment. Then, there is less chance of the registration algorithm going badly wrong, and
resulting in a bad registration.
will (soft) limit the
x-translation to be within 10% of the field-of-view. This can be useful if you know that
the images to be registered are already in fairly good alignment, or you
set the initial transform to bring them fairly close to
alignment. Then, there is less chance of the registration algorithm going badly wrong, and
resulting in a bad registration.
 button. Note: these limits will apply to all future
registrations until they are changed.
button. Note: these limits will apply to all future
registrations until they are changed.
 If this option is selected,
the fixed and registered images are sub-sampled to rapidly estimate
an approximate registration at low resolution, before successively
increasing the resolution to obtain more accurate
registration. This option is strongly recommended unless you
already know that the two images are in reasonably good alignment.
If this option is selected,
the fixed and registered images are sub-sampled to rapidly estimate
an approximate registration at low resolution, before successively
increasing the resolution to obtain more accurate
registration. This option is strongly recommended unless you
already know that the two images are in reasonably good alignment.
 When this option is selected, a final registration is done using
linear interpolation. Normally, nearest-neighbour interpolation is used since it is
considerably quicker. However, to get sub-pixel accuracy, you need to select this option.
When this option is selected, a final registration is done using
linear interpolation. Normally, nearest-neighbour interpolation is used since it is
considerably quicker. However, to get sub-pixel accuracy, you need to select this option.
Sinc
will result in improved image quality, but at the expense of slightly
longer processing time for this last processing step. Resampling a large
image with sinc interpolation may take a few seconds.
 icon,
or by typing in the folder (directory) and file name of the image, or by pressing the right mouse
button and selecting from the menu of recently-used images.
icon,
or by typing in the folder (directory) and file name of the image, or by pressing the right mouse
button and selecting from the menu of recently-used images.

 button. This will
bring up a file chooser. Select
one or more images to register in the file chooser, and press the
button. This will
bring up a file chooser. Select
one or more images to register in the file chooser, and press the
Select button. You can add more images to this list by
pressing the  button.
Ensure that the images are in the order in which you want them to be
processed. If they are not in the right order, select one or more
images in the displayed list to move, and the click either the
button.
Ensure that the images are in the order in which you want them to be
processed. If they are not in the right order, select one or more
images in the displayed list to move, and the click either the  button or
  button to get them in the right order.
 button, or remove just some of the images by
first selecting them, and then clicking the
button, or remove just some of the images by
first selecting them, and then clicking the  button.
 button to perform the registration. Registration will take several minutes for each
of the images, during which time various progress indicators will
pop up, allowing you to cancel the registration at any stage. If
registration completes, the registered images will be
produced.
button to perform the registration. Registration will take several minutes for each
of the images, during which time various progress indicators will
pop up, allowing you to cancel the registration at any stage. If
registration completes, the registered images will be
produced.
MyImage, the registered image will be given the name
rMyImage.
Viewing the Result
Load
result
button  . With this
selected, as each registered image is produced, it is overlaid onto the image
in Jim's main display.
. With this
selected, as each registered image is produced, it is overlaid onto the image
in Jim's main display.
Note: you must have the fixed image loaded into Jim's main
display for this feature to work.