if you have difficulty.
- 2dseq contains the pixel data.
- reco contains details of how the image was reconstructed.
- method (higher up in the directory hierarchy) contains details of image acquisition.
Importing and Converting means changing a bunch of importable image files (such as DICOM files) into one of the multi-slice image formats (Analyze, NIFTI-1, NIFTI-2, UNC or multi-slice DICOM). The importing/converting process involves organising the images so that the resulting images each represent one "scan". What's the difference between importing and converting?
Jim can import/convert images in the following medical image file formats:
if you have difficulty.
If you have images in a format not currently supported, please contact
to discuss your requirements.
To import/convert images in one of these formats, select Image Converter ...
from the File menu.  .
.
The Image Converter window will now appear:
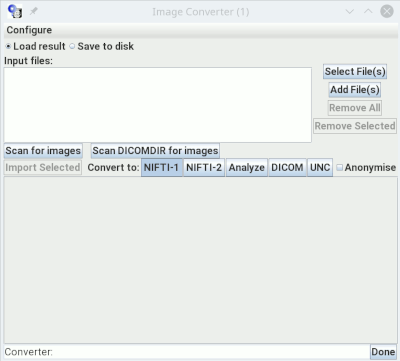
The Converter allows you to build a DICOM-like Patient/Study/Series/Acquisition/Image Tree structure, from images contained in a directory or set of directories. You can then select a particular group of related images and load them as a 3-dimensional image data set.
First, select the images files (such as DICOM files) to be
converted. Click the
 button to choose the image files. You select either a directory
containing some files, or individual files within a directory (press the
SHIFT or CONTROL keys on your keyboard to select multiple directories or
files). To convert Bruker
ParaVisionTM images, select the directory (or
directories) that contain the entire image data set(s). To convert
Varian/Agilent images, select either individual FDF files, or folder(s)
containing FDF files.
button to choose the image files. You select either a directory
containing some files, or individual files within a directory (press the
SHIFT or CONTROL keys on your keyboard to select multiple directories or
files). To convert Bruker
ParaVisionTM images, select the directory (or
directories) that contain the entire image data set(s). To convert
Varian/Agilent images, select either individual FDF files, or folder(s)
containing FDF files.
You can add more files to the list by clicking the
 button.
Then, press the
button.
Then, press the
 button.
Alternatively, if you are reading your DICOM images from an offline
image source, such as a CD-ROM, there may be a DICOMDIR file on the
disk. A DICOMDIR file lists all the scans that are present on the
CD-ROM, and scanning the DICOMDIR file is much quicker than reading all
the image headers. Click the
 button to
use this method of scanning for images.
A File Chooser will pop up, allowing you to
select the DICOMDIR file on the CD-ROM. The image scan will then begin.
button to
use this method of scanning for images.
A File Chooser will pop up, allowing you to
select the DICOMDIR file on the CD-ROM. The image scan will then begin.
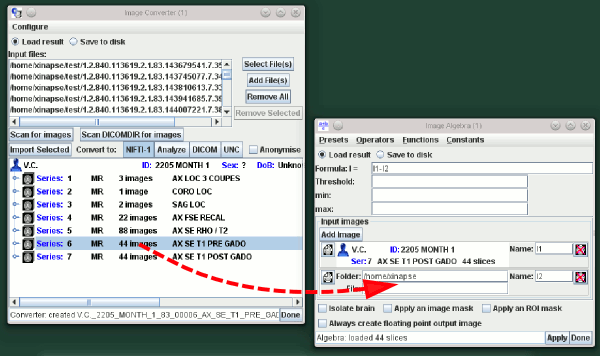
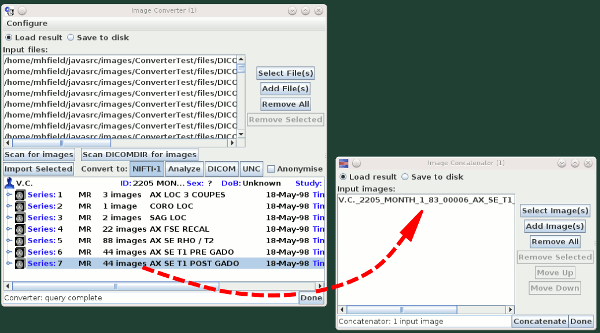
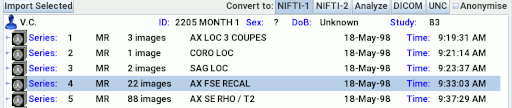
After scanning through the files you have chosen, the Converter will build a "tree" structure of patients and scans. Double click on one of the patients listed to show the individual image series (scans) for that patient, as shown below for patient "V.C".
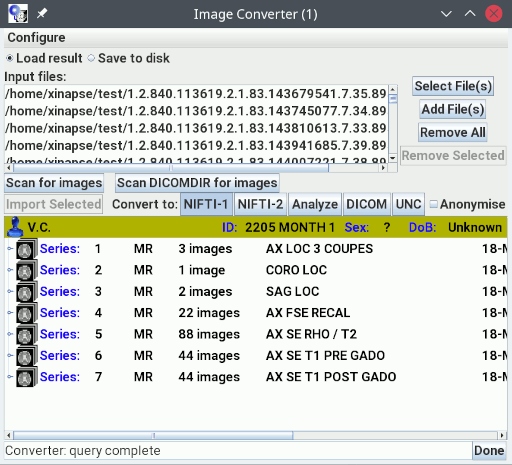
Double clicking on any part of the list either expands of collapses that part of the list.
To import images (load into the Jim's viewer), select "Load result". To batch convert images, select "Save to disk".

 button.
If the is not
active, then you have not selected a tree node that contains
only one 3-D dataset. Double click on that tree node to expand it, and
select one of the sub-nodes of the tree. After a few moments, the
multi-slice image that you selected will be loaded into the Image
Display frame, and the image selection box, near the top of the Image
Display frame will show a summary of the loaded image.

If you later save the image in one of the loadable formats, the suggested image name will be composed from a combination of the patient name, patient ID, study number, series number and acquisition number for the scan. Note that the imported data is not saved to disk in a loadable format unless you explicitly do so.
Choose the format of the images that will be created, by clicking on the appropriate button:

Then click the  button to start the conversion. The images will be stored in Jim's
current working directory. To change the image storage directory select
button to start the conversion. The images will be stored in Jim's
current working directory. To change the image storage directory select
Image Storage Directory from the Configure menu
(see below).
If you do not want to import or convert all slices of a particular scan, then double click on the series node for that scan to expand it and show the nodes for the individual image slices. If a series has multiple acquisitions, then double click on the acquisition node also. Use the SHIFT and CONTROL keys on your keyboard as you click on the slices you want (to select more than one slice). In the example below, the CONTROL key was pressed as the mouse was clicked on the individual slices, to select just slices 1, 3, 5 and 6 of Series 4.
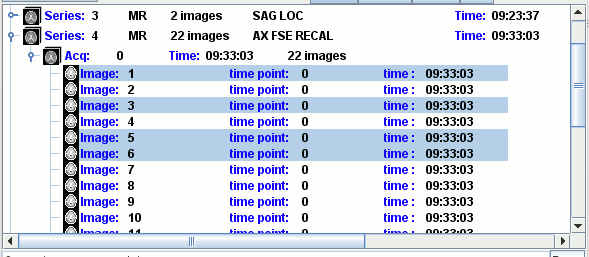
Press the SHIFT key as you click to select a complete range of slices.
If you want to anonymise the patient details, select the
 check-box before
you start the conversion or import. The patient name and other patient
details (such as the patient's maiden name, address and 'phone number)
will be stripped from the images as they are created. If the input images are
DICOM images, all private DICOM elements will be removed on conversion.
In addition, the file name of the image created will not contain the
patient's name.
check-box before
you start the conversion or import. The patient name and other patient
details (such as the patient's maiden name, address and 'phone number)
will be stripped from the images as they are created. If the input images are
DICOM images, all private DICOM elements will be removed on conversion.
In addition, the file name of the image created will not contain the
patient's name.
Note: You can anonymise DICOM files without converting them using the
DICOM anonymiser tool.
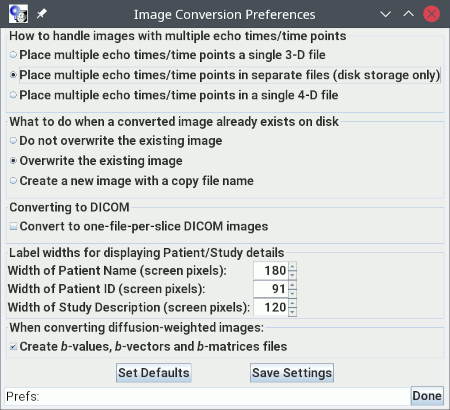
The following options are available under the
This allows you to choose:
The different echo times or time points can be:
Click the
Click the Configuring Image Converter
Configure menu:
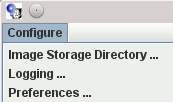
Use this to change the location where converted images will be stored.
When you click this, a File Chooser
pops up allowing you to select the new directory for image storage.
Normally image import and conversion occurs "silently" -
messages and errors are not displayed to the user. To turn on logging of
warning and error messages, select this menu item, and then choose a file
name for logging. All messages will be written to the chosen log file
until logging is turned off.
This pops up the preferences dialog for Image Converter:
 button
to save the settings so that they will be retained next time you start
Jim.
button
to save the settings so that they will be retained next time you start
Jim.
 button
in the Image Converter when you have finished with importing or converting images.
button
in the Image Converter when you have finished with importing or converting images.