Performing the Uniformity Correction
The Uniformity Correction tool takes a single input image, estimates the bias field, and creates
an new image with the non-uniformity corrected.
The new image can either be saved to disk, or loaded into Jim
depending on your selection:

The estimated bias field can also be saved as an image on disk and applied to other images of the
same dimensions.
There is just one settings that affects the quality of the correction:

Setting a higher number of levels-of-detail will result in a more detailed estimate of the bias
field.
- Setting a value which is too low will result in not enough detail in the bias field
estimate to model the true bias field. The bias field estimate will be too smooth to
capture the details of the true bias field.
- Setting a value which is too high will cause bias field estimation to
take much longer, and will result in spurious detail in the bias field
estimate. Then some of the intensity variation which is due to true
variations in tissue type will be removed, reducing the image contrast. If
you create an image of the bias field, by selecting the
the
 check-box, the
resulting bias field image will start to show variations which follow the
type of tissue if the number of levels-of-detail is set to high.
check-box, the
resulting bias field image will start to show variations which follow the
type of tissue if the number of levels-of-detail is set to high.
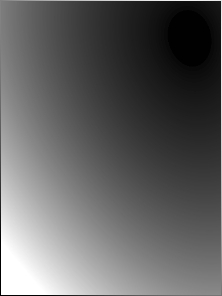
The effect of the different levels-of-detail on bias field estimates for a
T1-weighted head image.
 |
 |
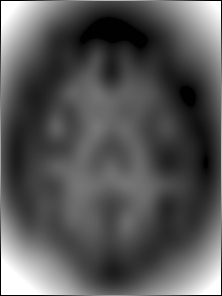 |
| Level-of-detail=1. Not high enough to capture the bias field. |
Level-of-detail=3 |
Level-of-detail=5. Too high - grey/white matter variations are being corrected. |
A setting of 3 should be about right for most MR images.
You may also need to set the maximum number of iterations. Uniformity correction is an iterative
procedure, and the
maximum number of iterations allowed is set in the text box:
 . In the
unlikely event that the uniformity correction procedure fails with a message that the maximum
number of iterations was exceeded, you should increase the value from its default.
. In the
unlikely event that the uniformity correction procedure fails with a message that the maximum
number of iterations was exceeded, you should increase the value from its default.
Select the image you want to correct by clicking on the
 icon,
or by typing in the folder (directory) and file name of the image, or by pressing the right mouse
button and selecting from the menu of recently-used images.
icon,
or by typing in the folder (directory) and file name of the image, or by pressing the right mouse
button and selecting from the menu of recently-used images.

Now click on the  button to perform
the correction. If you have chosen to save the corrected image to disk, then a
File Chooser will pop up, prompting
you to choose a file name for the new image. Otherwise, the result
will be loaded into Jim.
button to perform
the correction. If you have chosen to save the corrected image to disk, then a
File Chooser will pop up, prompting
you to choose a file name for the new image. Otherwise, the result
will be loaded into Jim.
Input Image Masking
The standard masking options
are available to exclude pixels in the calculation of the bias. This
can be useful for removing portions of the image where bias correction is not important.