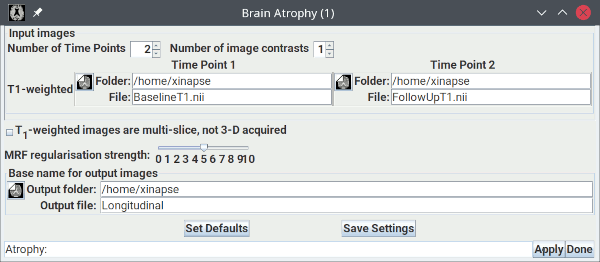
The picture below shows the setup for assessing changes in brain atrophy over time, using T1-weighted images.
 spinner. In this example,
there are two time-points, but you can set this to more than two if your have more follow-up
images.
spinner. In this example,
there are two time-points, but you can set this to more than two if your have more follow-up
images.
BaselineT1.nii" and "FollowUpT1.nii"
for the two time-points.
 .
If the T1-weighted images were acquired multi-slice (with slice
selection), rather than 3-D (with the slice dimension being
phase-encoded), then select this option.
.
If the T1-weighted images were acquired multi-slice (with slice
selection), rather than 3-D (with the slice dimension being
phase-encoded), then select this option.
 slider at its
default value of 5. This should not need to be changed.
slider at its
default value of 5. This should not need to be changed.
 button to start the
analysis, which will take some time. When the analysis is complete, you will
see a pop-up message showing the results:
button to start the
analysis, which will take some time. When the analysis is complete, you will
see a pop-up message showing the results:

LongitudinalGMPrior.nii - the grey-matter prior probability image, registered to
the average co-registered T1-weighted images.LongitudinalWMPrior.nii - the white-matter prior probability image, registered to
the average co-registered T1-weighted images.LongitudinalCSFPrior.nii - the CSF prior probability image, registered to
the average co-registered T1-weighted images.LongitudinalLVPrior.nii - the lateral ventricles prior probability image,
registered to the average co-registered the T1-weighted
images.LongitudinalPosition.nii - an image of the pixel positions in
template image space.Longitudinal_Det1_2.nii - showing the determinants of the
Jacobian for the deformation that maps the first time-point to the second.
rBaselineT1_pGM.nii and code>rFollowUpT1_pGM.nii- the grey-matter posterior
probability images for the two time-points.rBaselineT1_pWM.nii and code>rFollowUpT1_pWM.nii- the white-matter posterior
probability images for the two time-points.rBaselineT1_pCSF.nii and code>rFollowUpT1_pCSF.nii- the CSF posterior
probability images for the two time-points.rBaselineT1_pOTHER.nii and code>rFollowUpT1_pOTHER.nii- the other (non-tissue
class) posterior probability images for the two time-points.rBaselineT1_Classes.nii and rFollowT1_Classes.nii - colour images
showing the final segmented tissue classes at each time-point.
rBaselineT1.nii and rFollowUpT1.nii- co-registered versions of
the input images produced during Part 1 of the processing (see below).
bcrBaselineT1.nii and bcrFollowUpT1.nii- bias corrected versions
of the input images. Bias field correction occurs as a side-effect of the
Expectation-Maximization algorithm.
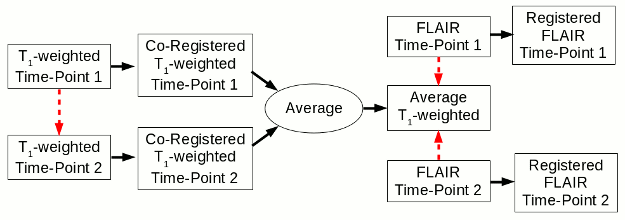
Part 1 of Longitudinal Atrophy Processing
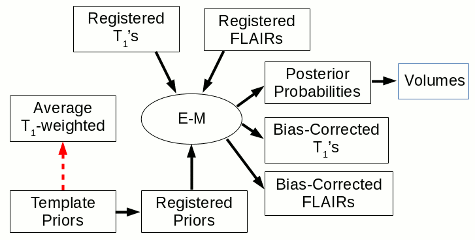
Part 2 of Longitudinal Atrophy Processing
The red arrows indicate a registration step, with the arrow pointing towards the registration target. The use of the FLAIR image is optional. E-M: expectation-maximization classification algorithm.