 .
The different myocardial segments are numbered increasing clockwise from the
insertion point handle.
.
The different myocardial segments are numbered increasing clockwise from the
insertion point handle.
The endo- and epi-cardial borders of the left ventricle must be defined on
every image time point and on every image slice that you want to analyse.
You would normally use closed
Spline ROIs to define the
borders, but you can also use
Irregular ROIs.
Note that as soon as you have defined two ROIs, where one ROI is contained within the other, you
will see the cardiac segments superimposed on the myocardium. The position of the radial dividing
lines is determined by the insertion point handle
.
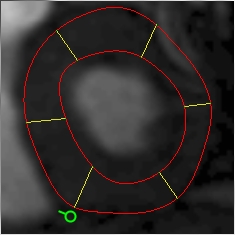
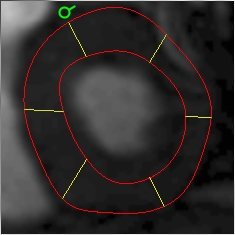
The different myocardial segments are numbered increasing clockwise from the
insertion point handle.
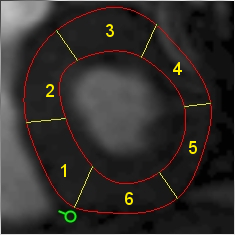
Cardiac segment numbering - clockwise from the insertion point handle.
You can drag the insertion point handle so that the first segment is in the position you want.
 |
 |
|---|---|
| Posterior insertion point | Anterior insertion point |
There are two ways to create ROIs at all time-points:
 button.
Inspect the myocardial borders at all time-points by paging through the image slices. If the borders are not satisfactory, you have 2 options:
 button. This will undo the propagation, allowing you
to manually define the myocardial borders at more time-points
(especially at the time-points where the propagation fails
badly). Then press the
button again to redo the propagation.
button. This will undo the propagation, allowing you
to manually define the myocardial borders at more time-points
(especially at the time-points where the propagation fails
badly). Then press the
button again to redo the propagation.
To get started, choose a 'typical' image time-point. Define the endo- and epi-cardial borders using two regions of interest, using closed Spline ROIs. If the contrast varies thought the time time-series, you are recommended to choose a time-point with good contrast so that the borders can be clearly delineated. In the picture below, from a cardiac perfusion series, we have chosen a time point where the contrast agent is visible in the left ventricle.
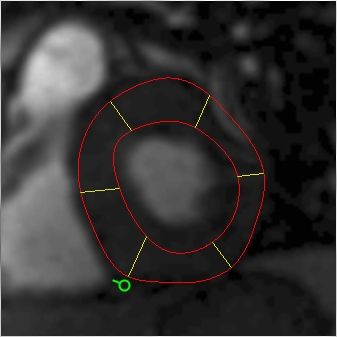
Endo- and epi-cardial borders on an MRI perfusion image.
 button to copy the myocardial
borders to all time points after the current time point. Any ROIs currently defined at
the forward time points will be replaced.
button to copy the myocardial
borders to all time points after the current time point. Any ROIs currently defined at
the forward time points will be replaced. button to copy the myocardial
borders to all time points before the current time point. Any ROIs currently defined at
the backward time points will be replaced.
button to copy the myocardial
borders to all time points before the current time point. Any ROIs currently defined at
the backward time points will be replaced. button to copy the
myocardial borders to all time points (before and after the current time point).
Any ROIs currently defined at other time points will be replaced.
button to copy the
myocardial borders to all time points (before and after the current time point).
Any ROIs currently defined at other time points will be replaced.Having copied the ROIs forwards or backwards, you can then page through the time points, making any adjustments needed to the position and shape of the ROIs.