View menu:
 .
.
You can overlay one or more images on top of the main displayed image, subject to all the images having the same number of rows, columns and slices.
Start the image overlay from the View menu:
.
This brings up the Overlay Image dialog:
Each overlaid image can be selected from an overlay image tab.
With a tab selected, the image to overlay is selected by clicking on the  icon. This will pop up a file chooser for you to
select the overlay image. Alternatively, hold down the right mouse button inside the image
selection panel, to see a list of recently-selected images from which you can select one.
icon. This will pop up a file chooser for you to
select the overlay image. Alternatively, hold down the right mouse button inside the image
selection panel, to see a list of recently-selected images from which you can select one.
Note: The overlay image must have the same number of rows, columns and slices as the current loaded image, or an error message will be displayed in the status bar of the Overlay Image dialog.
Note: If the overlay image does not have the same pixel sizes as the displayed image, it will still be shown, but the scaling will be incorrect (i.e., it will be shown at the incorrect size in comparison to the displayed image). A warning message will be shown in the status bar if this is the case.
The image you just selected will now be shown on top of the current loaded image. The overlaid
image is transparent, and you can change its opacity from 0 (completely transparent) to 1
(completely opaque) using the Opacity slider. The figure below shows an MRI head image with an
extracted brain overlaid using the green colour mapping. To select the colour mapping for an
overlaid image, first make sure that the tab for the overlay image is selected, and then choose the
colour mapping from from the View menu of the Overlay Image dialog.
 |
 |
 |
| Opacity=0.3 | Opacity=0.5 | Opacity=0.7 |
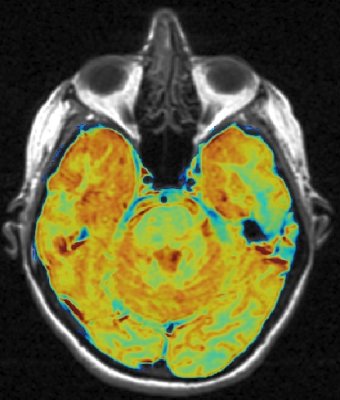
You can also make the background of the overlaid image completely transparent,
regardless of the setting of the Opacity slider by checking the  check box. Any
pixels which have an intensity value below the Min contrast slider value will
be completely transparent. You may want to mask the overlaid image to obtain
pixel intensities of zero in the background using either the ROI Toolkit or the Masker. Below you can see a masked
T2-weighted image overlaid on a T1-weighted image,
with a completely transparent background.
check box. Any
pixels which have an intensity value below the Min contrast slider value will
be completely transparent. You may want to mask the overlaid image to obtain
pixel intensities of zero in the background using either the ROI Toolkit or the Masker. Below you can see a masked
T2-weighted image overlaid on a T1-weighted image,
with a completely transparent background.
You can adjust the contrast and brightness settings for the overlaid image
(independent of the current loaded image) using the sliders in the Contrast panel as usual.
When you have finished with the overlay image, click on the
 button.
You can rapidly toggle the overlay image on and off using the  check box.
Note: you can overlay images onto movies as well, from the Movie frame.
You can overlay as many images as you wish. To add another overlay image, select
To select a colour mapping to load for one of the three overlays, click the
 from the File
menu in the Overlay Image dialog. This creates a new tab in which you
can select a new image to overlay as above. The images will be displayed with the image in the
main display drawn first, which is overlayed by the image in the first overlay tab, which is
overlaid by the image in the second tab etc. If any overlay image is completely
opaque, the images drawn underneath will not be visible.
from the File
menu in the Overlay Image dialog. This creates a new tab in which you
can select a new image to overlay as above. The images will be displayed with the image in the
main display drawn first, which is overlayed by the image in the first overlay tab, which is
overlaid by the image in the second tab etc. If any overlay image is completely
opaque, the images drawn underneath will not be visible.
Setting Default Colour Mappings
If you find yourself repeatedly setting the same colour mappings for the overlay
images after you have loaded them, you can do this automatically. Select
 from
the View menu. This brings up a dialog in which you can set up to
three default colour mappings to use for the first three overlay images.
from
the View menu. This brings up a dialog in which you can set up to
three default colour mappings to use for the first three overlay images.
 button. To go back to the default colour mapping, select the
 button when the colour
mapping selection dialog pops up.
button when the colour
mapping selection dialog pops up.