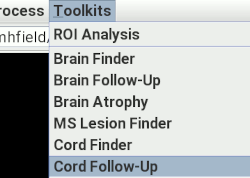
Toolkits menu:
The Cord Follow-Up tool can estimate the change in spinal cord atrophy between two time-points. The Cord Follow-Up tool first straightens the cord, then co-registers straightened cord images from the two time-points in a half-way registration space, and performs cord outlining for each of the two time-points in this registered space. The tool performs the analysis twice: once by registering the second time-point to the first, and then again by registering the first time-point to the second. This is done to reduce bias in the registration process. As an aid to visualising the results, the half-way registered straightened cord images are written to disk, together with the corresponding cord outline ROI files.
By default, the registered straightened cord images are only output for the forward registration direction (second time-point registered to the first), although there is an option to output registered images for both directions.
Start the Cord Follow-Up tool from the Toolkits menu:
The Cord Follow-Up tool will now appear as shown below:
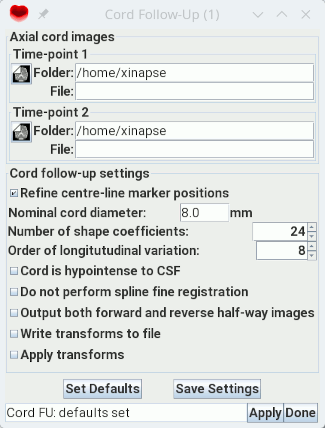
You can assess the change in spinal cord atrophy between two time-points in a similar way that you assess cord cross-sectional areas for individual scans. Prepare the images at each time-point as you would for the Cord Finder tool.
 Select this if you are working
with T2-weighted images. If working with
T1-weighted images, then leave this
unchecked. It is NOT recommended to
use T2-weighted image, since the
reliability of the Cord Follow-Up tool has not been tested
with T2-weighted images.
Select this if you are working
with T2-weighted images. If working with
T1-weighted images, then leave this
unchecked. It is NOT recommended to
use T2-weighted image, since the
reliability of the Cord Follow-Up tool has not been tested
with T2-weighted images.
 The Cord Follow-Up tool co-registers
the straightened images of the cord at the two time-points. By default, it performs a fine
spline-based deformation to obtain the best alignment. If you find this to be
unreliable, you can disable this fine registration by selecting this check-box.
The Cord Follow-Up tool co-registers
the straightened images of the cord at the two time-points. By default, it performs a fine
spline-based deformation to obtain the best alignment. If you find this to be
unreliable, you can disable this fine registration by selecting this check-box.
 By default, the Cord Follow-Up tool outputs straightened cord images in
the half-way registered space only for the forward registration direction. When this
check-box is selected, images for the both forward and reverse registration directions are
output, together with the corresponding cord outline ROI files.
By default, the Cord Follow-Up tool outputs straightened cord images in
the half-way registered space only for the forward registration direction. When this
check-box is selected, images for the both forward and reverse registration directions are
output, together with the corresponding cord outline ROI files.
The half-way straightened cord images and corresponding cord outline ROI files will be
prefixed by hwFwd for the forward direction, and hwRev for the
reverse direction.

 button.
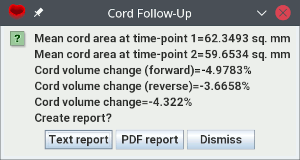
 button (to a get a report in text format) or
the
button (to a get a report in text format) or
the  button to get a report in
PDF format. Click the
button to get a report in
PDF format. Click the
 button if you do not want a detailed report.
As well as the results above, a report will detail the the cross-sectional areas at regular intervals (in steps equal to the original slice thickness) down the cord, for both time-points, and produce a graph showing the same. The cross-sectional areas are measured in a plane that is perpendicular to the local cord centre-line.
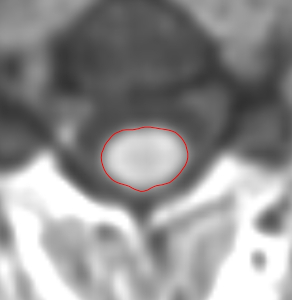
Also produced are two straightened images of the cord, registered to their half-way location; these will have the same names as the input images but with the name prefixed by "hw" (half-way). The cord outlines are saved to ROI files with names taken from the input image name but prefixed by "hw", and suffixed by "_cord.roi".
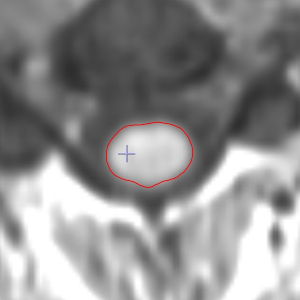
Below are images of the cord acquired 1 year apart, with the cord registered to the half-way location, and with the cord outline ROIs loaded.
|
|
Baseline cervical cord and segmentation |
1 year follow-up cervical cord and segmentation |