Marking the Cord
Now that you have a set of
axial
(transverse) slices, you can now go on to manually mark the approximate centre line of the
cord. You need to select two landmarks along the cord so that you reliably identify the section
of cord you are to assess. In this example, we will be evaluating the cord cross-sectional area
between the superior margin of C2 and the disk at the C5/C6 level.
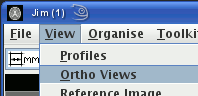
First load the axial image into Jim's main display. Then from "View" menu,
select "Ortho views":
Use the orthogonal views to identify the most superior slice in which the odontoid process of the
epistropheus (C2) is still just visible (as shown arrowed in the picture below).
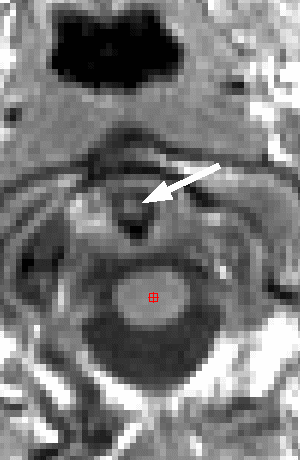
Most superior slice with the odontoid process just still visible,
with the first cord centroid Marker.
Place a Marker ROI at the centre-of-area of the cord.
When placing a Marker, please ensure that:
- The main display of the axial slice is well zoomed in so that you can place the Marker
accurately at the centre of the cord.
- You take care in this interactive part of the analysis. Place the Marker on the mid-line
and mid-way between the most anterior and most posterior portions of the cord.
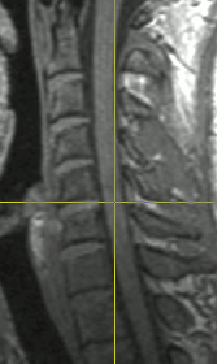
Now move down through the slices to the C5/C6 disk and place a marker at the centre-of-area of the
cord there. Use the inferior border of C5 as a reference, as shown in the picture of the
orthogonal view below.
Place a Marker approximately every 10 mm (every 10 slices for a slice thickness of 1 mm), and
be sure to place a final Marker on the last slice where you identify your second landmark.
Save the ROIs to a disk file.
This ROI file will be used by the Cord Finder in the next section.