The Fuzzy Connections tool is designed to find fuzzy-connected features in images based on the features' intensity characteristics.
The algorithm used for the fuzzy connections is described in:
J.K.
Udupa and S. Samarasekera. "Fuzzy Connectedness and Object
Definition: Theory, Algorithms, and Application in Image
Segmentation". Graphical
Models and Image Processing
58:246-261 (1996).
Fuzzy connectivity is a seed-growing method: you define one or more regions on
interest that are all within the
feature you want to extract. The algorithm then grows the seed region(s)
based on the fuzzy affinity between pixels and their neighbours. The
fuzzy threshold setting then determines a cutoff fuzzy connectedness such
that all pixels above the threshold are considered part of the feature.
The affinity between pixels takes into account the degree of adjacency
between pixels as well as the similarity of their (multi-parametric)
intensity values. The result is a new set of ROIs that encompass the
fuzzy-connected feature.
Note: as of Version 6.0 of Jim, the fuzzy connectedness segmentation parameters
"threshold" and "3-D connection" are
written into each of the ROIs created as the "source" of the ROI.
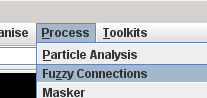
Start the Fuzzy Connections tool from the Process menu:
The Fuzzy Connections tool, is shown below.
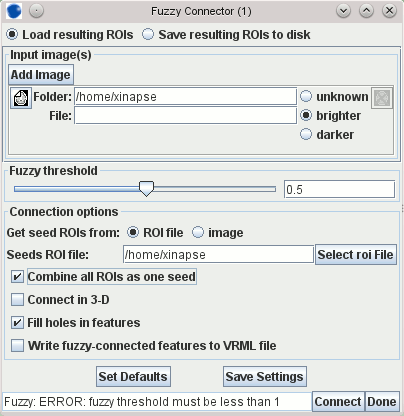
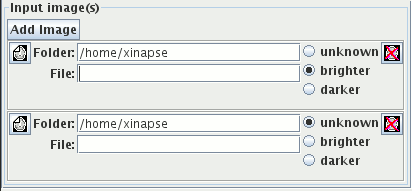
The Fuzzy Connector can work one or more input images, where all images show the same anatomical features in exactly the same pixel locations, but with different image contrast. For example, these could be the two echoes (proton-density-weighted and T2-weighted) from a double-echo MRI sequence. Or they could be T1-weighted and T2-weighted images acquired sequentially but with exactly the same data matrix and slice locations. All input images must be of the same dimensionality (i.e., the same number of slices, and rows and columns within the slice), and in order to match the position of each pixel spatially, they must also have the same pixel sizes and slice thicknesses. If you want to work with images that have slightly different pixel positions or different pixel sizes, you may be able to use the Image Registration tool to bring all images into alignment and make them have the same dimensionality. If your images are already aligned, but have different numbers of pixel samples, then you can use the Image Resampler tool to get the numbers of samples to match across all images.
Click the  button until you
have the correct number of image selection panels. The figure below shows
the setup for working with two input images.
button until you
have the correct number of image selection panels. The figure below shows
the setup for working with two input images.
 icon.
icon.
For each of the input images, set an input image file by
clicking on the load image icon:  . This will
bring up a File Chooser that you
can use to set the input image. Alternatively, you can simply type in the folder and
image file name in the text fields, or you can press the right mouse
button and select from the menu of recently-used images.
. This will
bring up a File Chooser that you
can use to set the input image. Alternatively, you can simply type in the folder and
image file name in the text fields, or you can press the right mouse
button and select from the menu of recently-used images.
For each input image, you can also provide an "intensity hint". To the right of each input image, you will see:

 if the feature you want to extract is
always brighter than the surrounding background in this image.
if the feature you want to extract is
always brighter than the surrounding background in this image.
 if the feature you want to extract is
always darker than the surrounding background in this image.
if the feature you want to extract is
always darker than the surrounding background in this image.
 if the feature you want to extract
varies in intensity relative to the surrounding background in this image, or if
you aren't sure.
if the feature you want to extract
varies in intensity relative to the surrounding background in this image, or if
you aren't sure.
Next, set the fuzzy threshold. Selection of the right fuzzy threshold for your particular problem is a matter of trial and error. Setting a lower threshold results in a more generous inclusion of pixels in the extracted feature (a larger feature), while setting a higher threshold results in a more parsimonious inclusion (a smaller feature).

Now tell the tool where to find the ROIs that are used to define the seed pixels. The ROIs can either be read from a previously-saved ROI file, or they can be read directly from the image displayed in Jim's main display.

Load one of your input images into Jim's display.
Start the ROI Toolkit and define some ROIs that are within the feature you want to delineate. Any type(s) of ROI can be used. You can define a single ROI or multiple ROIs as long as they are all contained within the feature. For ROIs that have no area (Marker, Line and Curved Line ROIs), any pixels that the ROI touches will be used as seed pixels. For other ROIs (Rectangular, Elliptical or Irregular), pixels within the boundary of the ROI will be used as seed pixels. Then either:
 . Set the Fuzzy Connector to use
the ROI file you created by clicking the
. Set the Fuzzy Connector to use
the ROI file you created by clicking the  button and using the File Chooser to select the ROI file.
or
 . This will use the ROIs defined
on the displayed image to set the seed pixels.
. This will use the ROIs defined
on the displayed image to set the seed pixels.
The Fuzzy Connector will create ROIs surrounding the fuzzy-connected features
that it has found. However, you may want to visualise these features in
Jim's 3-dimensional display. If you
select the
For information about setting the connection options, please see the
specific details for the Fuzzy
Connector tool.
Write fuzzy-connected featured to VRML file
 check box,
then a surface model of the features found will be created, which can then
be loaded into the 3-D Display as a virtual reality modelling
language (VRML) file. The VRML file created will have a name taken from
the first input image name, with an extension
check box,
then a surface model of the features found will be created, which can then
be loaded into the 3-D Display as a virtual reality modelling
language (VRML) file. The VRML file created will have a name taken from
the first input image name, with an extension .wrl
Connection Options